

GitHub Actions is a CI/CD pipeline tool using which you can automate your build, test, and deployment workflow. Using it you can design workflows that deploy merged pull requests to production or build and test each pull request before adding it to your code repository.
When an activity takes place in your repositories, such as a pull request by software developer or the creation of an issue, you can set up a GitHub Actions workflow to be triggered. One or more jobs in your workflow are capable of running simultaneously or sequentially. Each job contains one or more steps that execute a script that you write or an action, a reusable extension that can streamline your workflow. Each job runs inside its own virtual machine runner or inside a container.
Here we will be using GitHub Action to host a static website on the S3 bucket. First, we will create an S3 bucket with adequate permissions.
Step1: Create an S3 bucket on AWS Cloud
- Login to your AWS cloud account, go to the S3 dashboard and click Create bucket.
- Keep your AWS S3 bucket name the same as your domain name.
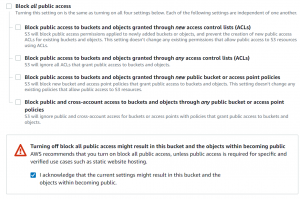
- Uncheck Block all public access and click create bucket.
- Once the bucket is created, go to Properties->Static website hosting. Click Edit.

- Enable static website hosting and enter the index document name.

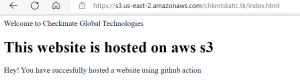
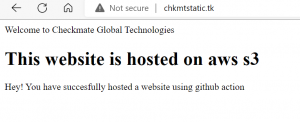
- Here we are using a sample HTML file.
 Welcome to Checkmate Global Technologies
 This website is hosted on aws s3
  Hey! You have succesfully hosted a website using github action
- Go to Permissions->Bucket policy. Click Edit and paste the following code and save changes.
{
         "Version": "2012-10-17",
         "Statement": [
           {
             "Sid": "PublicReadGetObject",
             "Effect": "Allow",
             "Principal": "*",
             "Action": [
             "s3:GetObject"
                      ],
             "Resource": [
             "arn:aws:s3:::Bucket-Name/*"
                         ]
           }
     ]
}
Step2: Create GitHub Actions Workflow
- Go to your GitHub repository.
- We need to provide IAM user access credentials. For that click Settings->Secrets->Actions->New Repository Secret.
- Write AWS_ACCESS_KEY_ID in the name and enter the ID in value and click add secret.
- Repeat the above step with AWS_SECRET_ACCESS_KEY.
- Now go to your project root directory.
- Create a folder .github and inside it create another folder workflows. Next, create a yaml file in the folder.

- Paste the following code into the block.
name: Host Website

on:
  push:
    branches:
    - main

jobs:
  deploy:
    runs-on: ubuntu-latest
    steps:
    - name: Checkout
      uses: actions/checkout@v2

    - name: Configure AWS Credentials
      uses: aws-actions/configure-aws-credentials@v1
      with:
        aws-access-key-id: ${{ secrets.AWS_ACCESS_KEY_ID }}
        aws-secret-access-key: ${{ secrets.AWS_SECRET_ACCESS_KEY }}
        aws-region: us-east-2

    - name: Deploy static site to S3 bucket
run: aws s3 sync . s3://BUCKET_NAME --delete- Replace the bucket name and AWS region and commit the file.
- Now go to Actions.
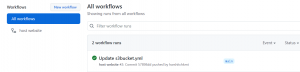
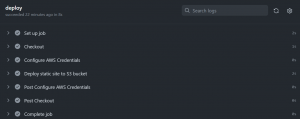
- We can see that our workflow was run successfully.
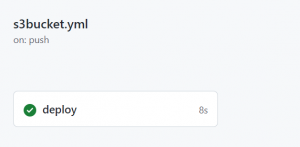
- Click on the workflow.
- Now go to our s3 bucket. Our website code is uploaded there.
- Our website can be accessed using the object url.

Step3: Configure Route53 for mapping object endpoint to the domain name.
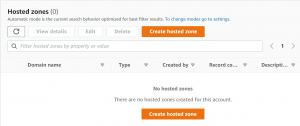
- Go to Route53 dashboard.
- Click on Hosted Zones-> Create Hosted Zone.
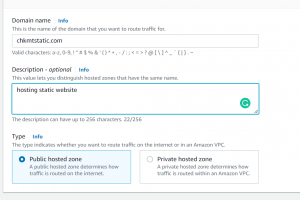
- Write domain name and click create hosted zone.
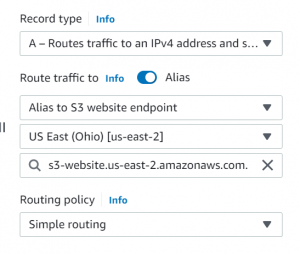
- Next, click on create record. Select A type record and route traffic to alias. Select the end point of your s3 bucket.
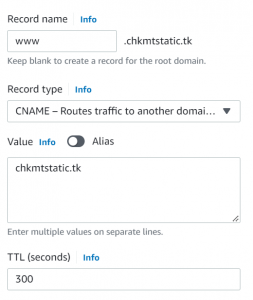
- Next, create a CNAME type record.
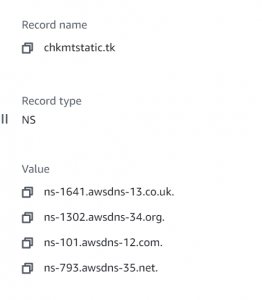
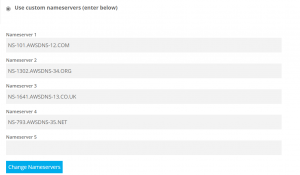
- Next, we have to replace the nameserver for your domain with the nameserver from route 53. Copy the ns records and go to your hosting provider and change nameservers.
- Now we can access our static website with our domain name.
Please connect with our DevOps Consultants to automate your CICD pipeline for faster go to market. Reach out to us hire DevOps Engineer.
