

CloudFront is a web service provided by AWS cloud that speeds up the distribution of static and dynamic web content to end-users. It is a global content delivery network that helps deliver websites, apps, and APIs securely at high speed and low latency.
To deliver content to users CloudFront makes use of edge locations. Edge locations are data centers spread around the world. They cache copies of the content that they serve, so that content is closer to users and can be delivered faster.
We will serve a static website hosted on AWS S3 with CloudFront. For that we need to follow the below steps:
Step1: Deploy a static website on AWS cloud S3
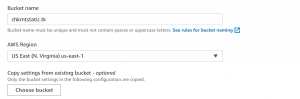
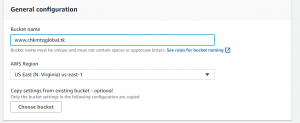
- Create two S3 buckets. The name of one bucket should be the same as your domain name with www and the other bucket name should be the same as the domain name without www.
- For the s3 bucket with a name without www, upload the code, enable public access and add the following bucket policy.
{
    "Version": "2012-10-17",
    "Statement": [
        {
            "Sid": "ReadAll",
            "Effect": "Allow",
            "Principal": {
                "AWS": "*"
            },
            "Action": "s3:GetObject",
            "Resource": "arn:aws:s3:::your-bucket-name/*"
        },
    ]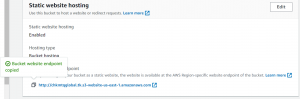
}- Now enable static website hosting.
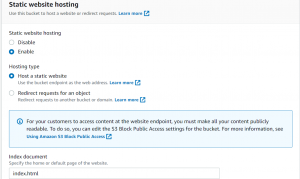
- Now go to AWS cloud S3 bucket having a name with www. Go to static website hosting and select redirect request as hosting type and enter the domain name without www to redirect.

Step2: Create a hosted zone in AWS cloud Route 53 and use the AWS Certificate Manager for the SSL certificate
- Now go to the Route53 dashboard and create a hosted zone for your domain.

- Replace the name servers at your hosting provider with the nameserver in the NS record created in Route 53.
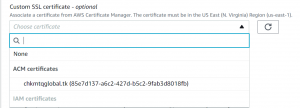
- Now go to the Certificate Manager dashboard, select North Virginia(us-east-1) region, and click request a certificate.
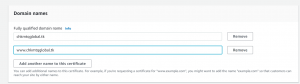
- Request a public certificate and enter your domain name and click request.
- Next copy the CNAME name and value for both domains and create CNAME records in Route 53 or directly click on Create records in Route 53.
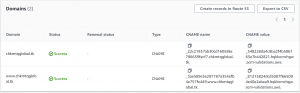
- In few minutes you will get success status.
Step3: Create AWS CloudFront Distribution
- Go to CloudFront dashboard and click on create distribution.
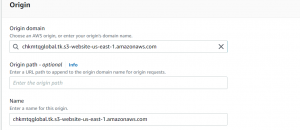
- Copy and paste the website end point from S3 bucket in origin. Remove the http from endpoint.
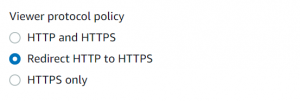
- Change viewer protocol policy to Redirect http to https.
- Add the alternate domain name.

- Select the SSL certificate of your domain.
- Next, click on create distribution. It can take some time to be created.
- Once the distribution is created, copy the distribution domain name and go to the Route53 dashboard.
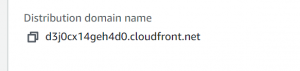
- Create an A record for the domain. Select alias and route traffic to CloudFront distribution and paste the distribution domain name.
- Create another A record for the domain name with www. Route traffic to the endpoint of the S3 bucket with the www domain name and paste the endpoint link and save.
- Now we can access our website from the browser with the domain name and we will be served our website via CloudFront distribution.
Srep4: Set up AWS WAF for CloudFront distribution.
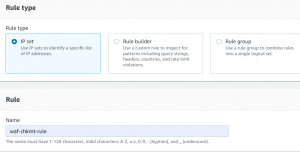
- Go to AWS WAF dashboard. Click on IP sets on the left side. Next click on create IP set.
- Select the region as CloudFront globalAdd IP set as rule type and select the IP set that we created. and enter the IP address set for which you want to allow, block or count the received requests.
- Click Create web ACL.
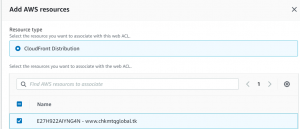
- Select CloudFront distribution as resource type and add it to AWS resource.
- Add IP set as rule type and select the IP set that we created.
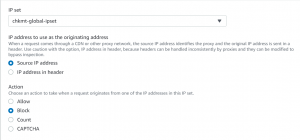
- Select block action and click Save.
- Now click on Add rule and select Add managed rule groups.
- Add Amazon IP reputation list rule group to web ACL, scroll down click on Add rule.

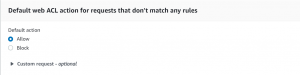
- Next select default action for requests that don’t match any rule. We will be using allow here.
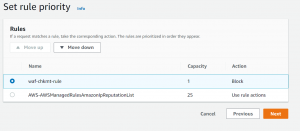
- Next, we have to select rule priority.
- Next, configure AWS cloud monitoring on CloudWatch with metric name and enable sampling requests.
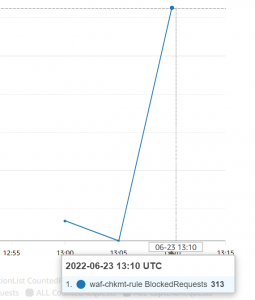
- Now the requests coming from IP defined in IP set will be blocked.
- After a few minutes, we will be able to see the requests coming from the blocked IP set.
Author Information
This blog is written by Checkmate Global Technologies DevOps engineering team. We have got expertise to manage Cloud DevOps infrastructure Technology stack. Our cloud engineering team can ensure seamless, risk-free, secure stable production operations. Connect now with our technical Consultant to hire experienced cloud engineer.
