

What is MySQL?
MySQL is one of the most used relational database management system(dbms) based on SQL, developed and distributed by Oracle corporation. it’s a relational database stores data in tables in which data in tables may be related to each other these relations between tables helps to structure the data and preform operations like Create , Read, Update and Delete famously known as CRUD operations.
What is database replication?
database replication is way of copying or storing data at more than one server/node, it helps to increase availability of data, replication is a simple process of copying data from one server to other so that all the users are enabled to access same data at a particular point of time without any inconsistency, by default all the MySQL replications are asynchronous which means data is written to primary storage first and then copied on to the secondary in contrast data is written to both the servers simultaneously in synchronous replication.
Master Master replication:
To understand what is master master you have to know what is master node and what is a slave node, a users can both read and write data to a master node where as all the data written to master is copied to slave node which acts as read only server to users, in master master replication there will be more than one master node/server ,here a two way communication is established between all the master nodes where data written to any of the master node is copied to all other master nodes and slave nodes, each master node can have slave nodes separately, this increases the availability of database for users to both read and write data .
Steps to setup Master Master replication
I am using two aws ec2 instances with RHEL platform and assume these are Private IPv4 addresses of the instances.
Instance-1:  172.31.43.199
Instance-2: 172.31.33.123
Note: if you are also using instances hosted on any cloud provider please allow traffic on port number 3306 (mysql mostly uses this port number)
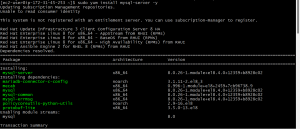
Step-1: Install MySQL on both the machines
follow all the below process for both the machines, let’s start with installing mysql-server on both the machines
execute this command on both your terminals to install mysql-server.
sudo yum install mysql-server -y
after the installation start the database server
systemctl start mysqld
enable the service, enabling makes it to automatically start on boot.
systemctl enable mysqld

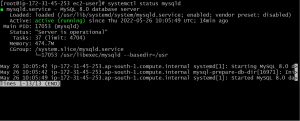
execute the given command to check the the status of MySQL server and confirm that it’s running
systemctl status mysqld
In step-2 we will configure server-1(machine-1) as master and server-2 (machine-2) as a slave for it.
Step-2: Configuring sever-1 as master node and server-2 as slave node.
edit the mysql-server.cnf file on your machine-1
sudo vi /etc/my.cnf.d/mysql-server.cnf
add these under [mysqld] in your configuration file , save it and close.
bind-address = 172.31.43.199(use your machine-1 private ip here)
server-id = 1
log_bin = mysql-bin

bind_address: tells MySQL on which network it can listen for connections, if you give 0.0.0.0 that means you are allowing access from any ip.
server-id: server id’s should be unique for every node/server.
log_bin: binary log is a sequence of files with a base name and numeric extension, server logs all statements that change data to the binary log, which is used for backup and replication.
Now restart your mysql-server using below command.
sudo systemctl restart mysqld
Now use below command and login to your mysql-shell
sudo mysql -u root -p
execute the below given commands in you MySQL shell , these commands will create a user and will grant the permission “REPLICATION SLAVE” to the created user on all the tables in all the databases.
mysql> CREATE USER 'aks'@'172.31.33.123' IDENTIFIED BY '@Aksshaay1';
mysql> GRANT REPLICATION SLAVE ON *.*TO 'aks'@'172.31.33.123';
Here “aks” is a user name , “172.31.33.123” is private-ip of my server-2 and “@Aksshaay1” is password for the user, “REPLICATION SLAVE” is a permission type given to user “aks” on all the databases and all tables(*.*)
then run below command to load the changes and exit.
mysql> FLUSH PRIVILEGES;
FLUSH PRIVILEGES will reload grant tables in mysql database , which makes changes to take effect immediately without restarting or reloading MySQL.
mysql> EXIT;

now use below command to verify the status of master , copy file name and position.
SHOW MASTER STATUS\G

Configure server-2 as a slave to server-1:
edit the configuration file “mysql-server.cnf”.
sudo vi /etc/my.cnf.d/mysql-server.cnf
add these under [mysqld] inyour configuration file.
bind-address=172.31.33.123(give your 2nd machine private ip here)
server-id=2
log_bin=mysql-bin
save the file and restart mysql-server
systemctl restart mysqld
login to your mysql shell to configure it as a slave for server-1
sudo mysql -u root -p
use below command to stop replication threads.
mysql> STOP SLAVE;

now run below command to set your server-2 to replicate data from master(server-1)
mysql> CHANGE MASTER TO
-> MASTER_HOST='172.31.43.199',
-> MASTER_USER='aks',
-> MASTER_PASSWORD='@Aksshaay1',
-> MASTER_LOG_FILE='musql-bin.000005',
-> MASTER_LOG_POS=1481;

then execute below command to start replication threads.
mysql> START SLAVE;
![]()
as of now we have created a one way communication from server-1(as master ) to server 2(as slave), now lets check our configuration.
on your server-1 use below command to create a database,
mysql>CREATE DATABASE dtabase_aks;
database_aks is the name of database iam creating, and use below command to check weather database is created or not.
mysql>SHOW DATABASES;
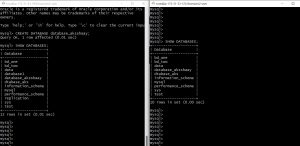
and now logon to your server-2 and use command SHOW DATABASES to check for replication, in the snapshot below left side is my server-1(master) , I created a database ‘databses_aksshaay’ and checking for replication of same in server-2 on the right side.
our configuration of server-1 as master ans server-2 as slave is done now let’s configure server-2 as master and server-1 as slave so that it will be a two way communication.
STEP-3: Configure Server-2 as Master and Server-1 as slave.
login to mysql shell of server-2
sudo mysql -u root -p
execute below commands to create user and give replication permission.
mysql> CREATE USER 'ajay'@'172.31.43.199' IDENTIFIED BY '@Password1';
GRANT REPLICATION SLAVE ON *.*TO 'ajay'@'172.31.43.199';
here ‘ajay’ is a user ‘172.31.43.199’ is private-ip of my server-1 and use below given command to reload the grant table
mysql> FLUSH PRIVILEGES;
execute below command and copy file name and position number which we will use later.
mysql> SHOW MASTER STATUS\G

copy file name and position number.
mysql> EXIT;
exit from your shell .
Configure server-1 as a slave to server-2:
login to your to mysql shell of server-1 and configure master details.
sudo mysql -u root -p
use below command to stop replication threads.
mysql> STOP SLAVE;
![]()
then execute below command to set master ,please use your server-2 private ip here, for user and password use from user created on server-2 and for file name and position number use the detail you copied from SHOW MASTER STATUS command on server-2.
mysql> CHANGE MASTER TO
-> MASTER_HOST='172.31.33.123',
-> MASTER_USER='ajay',
-> MASTER_PASSWORD='@Password1',
-> MASTER_LOG_FILE='mysql-bin.000005',
-> MASTER_LOG_POS=323;

use below command to start replication threads.
mysql>START SLAVE;

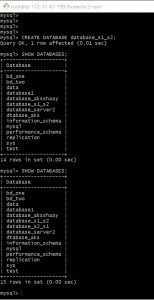
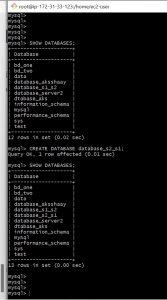
Yes that’s it you have configured a master master replication ,Lets test it now I am going to create a database named database_s1_s2 on server-1 which will be replicated on server-1 and a database named database_s2_s1 on server-2 which will be replicated on to server-1.
use below commands
To create data base , give your database name in the place of database-name.
CREATE DATABASE database-name;
To see databases
SHOW DATABASES;
My server-1 is on the left side and server-2 on the right ,first I am creating a database on server-1 and checking it on server-2 then creating a database on server-2 and checking it on server-1.
If you need an offshore cloud computing solution or a dedicated DevOps engineer to assist your production environment, please contact us. Our skilled offshore engineers are ready to take on any issues that arise in order to keep production running smoothly.
