

Google App Engine
App Engine is a managed service provided by google cloud platform, it provides you the simplest way to deploy and scale your applications in GCP and end-to-end application management, it supports Go, Java, .Net, Node.js, PHP, python, Ruby, using pre-configured run times, you can also use a custom run-time and write code in any language, App engine also supports running containers, Some of the important features of app engine are Automatic load balancing & Auto scaling, Application health monitoring, Application versioning, Traffic splitting .
Compute engine vs App engine
Compute engine is a IAAS (infrastructure as a service), it provides more flexibility compared to app engine, here you will be responsible for installing software’s, Choosing Hardware and maintaining availability and many more.
where App Engine is a PAAS (Platform as a service) serverless/ fully managed service provided by gcp, you will have less responsibilities and lower flexibility compared to app engine
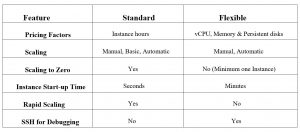
App Engine Environments – Comparison
App engine provides two different kinds of environments Standard and Flexible, use Standard when you want to run application in pre-configured language specific sandboxes where you will only take of your application, it provides services only for applications using Java, Python, PHP, Node.js, Ruby , Go . If you want to deploy containers use Flexible environment , it makes use of compute engine virtual machines , you can use any runtime as long as you can build a docker image for it, it also provides access to background processes in virtual machines, below given comparison will give a clear understanding of differentiation between both the environments.
In this blog you can learn to create and deploy a Python3 application on App Engine Standard Environment, before that Install and configure gcloud cli or you can also use cloud shell , if you are using cloud shell please skip installation and continue with initializing part.
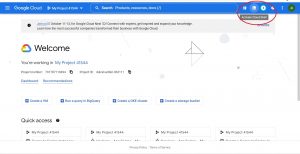
you can launch cloud shell from web console as shown below .
Installing gcloud CLI
following steps will only help you to install CLI on Linux 64-bit (x86_64) platform, run below given commands on your command line to download Linux 64-bit archive file and extract it .
curl -O https://dl.google.com/dl/cloudsdk/channels/rapid/downloads/google-cloud-cli-403.0.0-linux-x86_64.tar.gz
tar -xf google-cloud-cli-403.0.0-linux-x86_64.tar.gz
Now run below given command to install gcloud CLI , and enter yes and give the path when it prompts for
./google-cloud-sdk/install.sh
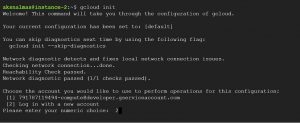
Initializing gcloud CLI
then to initialize gcloud CLI run gcloud init command on your terminal , Select option Log in with a new account when it prompts “choose an account that you would like to initialize with , same is shown in the below given snapshot”
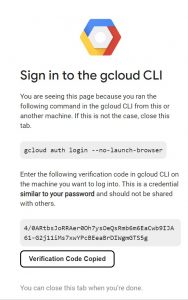
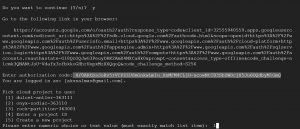
then a link will be provided which you should copy and open it in your browser and login to your gcp account in order to get authorization code .
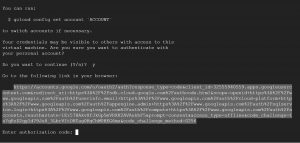
After opening the link in your browser , select the account that you want to authorize with and click on allow ,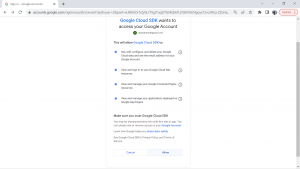
then copy the authorization code and give it in your terminal
Check the initialization by using any gcloud command

Writing the Web App
create a folder with any name(helloworld is the name used in this blog) , and create files named app.yaml, main.py, requirements.txt ,
To deploy your web app to App Engine, you need an configuration file named app.yaml , it defines your web application’s settings for App Engine , main.py is where the python code for this specific application is present , requirements.txt is where the dependencies of this application are mentioned .
copy the content into the files as given below
main.py
import flask
# If `entrypoint` is not defined in app.yaml, App Engine will look for an app called `app` in `main.py`.
app = flask.Flask(__name__)
@app.get("/")
def hello():
"""Return a friendly HTTP greeting."""
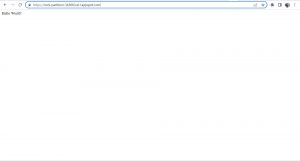
return "Hello World!\n"
if __name__ == "__main__":
app.run(host="localhost", port=8080, debug=True)
above given code is written using flask frame work , this just gives Hello World! on the website.
requirements.txt
Flask==2.0.3
app.yaml
runtime: python39
Now lets deploy this application on google App Engine, go on to your terminal and set the project that you want to deploy on, use below given command.
gcloud config set project <project-ID>

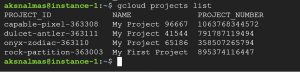
you can get project-ID by using command gcloud projects list
Now change to the directory where your application files are stored
cd helloworld
Create app using command gcloud app create and select the region that you want to deploy your app on, all the app engine commands starts with gcloud <app> , and it starts with gcloud <compute> for compute engine commands.

Now run the following command to deploy the application.
gcloud app deploy

Then use command gcloud app browse , it will give you a link to the application or it will directly open your application on the browser.

As we successfully deployed the application , lets see how versioning and traffic splitting works in app engine, you can list versions by using gcloud app versions list

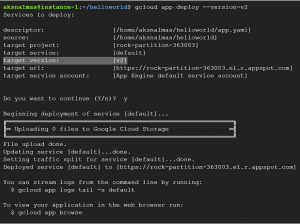
Now deploy the application again but with a version tag this time, In production you may have many changes in each version of the application to be deployed , but here I am deploying same deploying same application with a different version tag.
gcloud app deploy --version=v2
here v2 is the version name iam using.
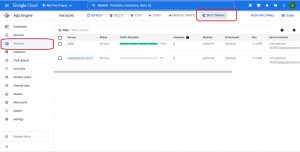
Once again check for the available versions , observe the highlighted in the following snapshot, traffic is completely diverted to newly deployed version even though both the versions are in SERVING status as we did not split traffic between any versions.

On your gcp web console go to versions in App Engine and click on split traffic,
Click on Add version and select version and traffic weight that you want to divert and save it.
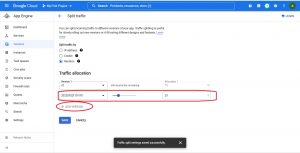
On your terminal or web console check for the traffic splitting now,

