

Identity and Access Management (IAM) is an AWS cloud service that allows you to manage access to other AWS cloud services in a secure manner. Using Identity and Access Management we can manage who is authenticated (signed in) and allowed (granted permissions) to access resources.
AWS cloud IAM Identities(users, user groups, and roles):
IAM identity provides access to the AWS account. These identities can be created by the AWS account root user or an IAM administrator for the account. A root user has access to all AWS services and resources and it gets created when we create our AWS account.
IAM users are entities that represent the person or application that interacts with AWS. In AWS, name, and credentials are required to define a user.
The term “IAM user group” refers to a group of IAM users. These user groups allow you to specify permissions for many users, thus making it easier to manage those users’ permissions.
A specific permissioned IAM identity that you can create in your account is called an IAM role. In the same way that an IAM user is an AWS identity, an IAM role is an AWS identity with authorization policies that define what the identity can and cannot do in AWS. A role, on the other hand, is intended to be assumed by anyone who needs it, rather than being tied to a single individual.
Steps to create an IAM user:
We will be creating a user who would have access to only a particular folder in an s3 bucket.
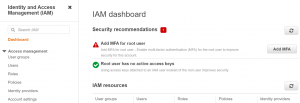
- Login to your AWS account and go to the Identity and Access Management dashboard.
- Go to Users->Add Users.
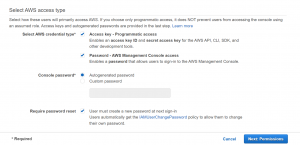
- Write the user name and select credential type.
- If you want to give command-line access to the user select Access key – Programmatic access and if you want to give console access select Password – AWS Management Console access. We can select both as well.
- For the console access either create a custom password or select autogenerated. Then select require password reset if you want the user to create a new password at sign-in.
- Click on Next: Permissions.
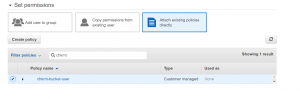
- After that Select attach existing policies->Create Policy. A new tab will open.
- Copy and paste the following code. This policy allows access to a folder “t1d” in the “chkmt-test-bucket” bucket. Replace the bucket and folder name and add or remove actions according to use case.
{
   "Version": "2012-10-17",
   "Statement": [
      {
         "Sid": "AllowUserToSeeBucketList",
         "Effect": "Allow",
         "Action": [
         "s3:GetBucketLocation",
         "s3:ListAllMyBuckets"
         ],
         "Resource": "arn:aws:s3:::*"
     },
     {
         "Sid": "VisualEditor1",
         "Effect": "Allow",
         "Action": [
               "s3:PutObject",
               "s3:GetObject",
               "s3:AbortMultipartUpload",
               "s3:DeleteObject",
               "s3:GetObjectVersion",
               "s3:ListMultipartUploadParts"
                ],
               "Resource": "arn:aws:s3:::chkmt-test-bucket/t1d/*"
      },
      {
        "Sid": "AllowListingOfTestBucket",
        "Effect": "Allow",
        "Action": "s3:ListBucket",
        "Resource": "arn:aws:s3:::chkmt-test-bucket",
        "Condition": {
                  "StringLike": {
                      "s3:prefix": [
                                      "",
                                      "t1d/*"
                                    ]
                                 }
                       }
        }
   ]
}
- Click on Next:Tags. Add tags and then click on Next:Review.
- Give name and description and click on create policy.
- After that go to add the user tab and select the policy that we have created.
- Add tags and then click on create user.
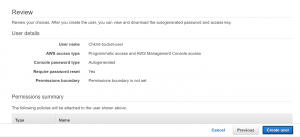
- Share the access id and access key to the user for command-line access and the password for console access.

Please contact our technical consultants if you would like to discuss any issue related to cloud DevOps infrastructure or software development.
