

Django is an open-source python-based framework that allows us to create web applications on AWS Cloud Ec2 instances.
In this blog, we will deploy our Django application on a Red Hat Linux Machine or AWS ec2 instance. We will use Gunicorn as a WSGI server and Nginx as a web server to improve the application scalability. Django by default comes with SQLite database but we will use PostgreSQL database.
Step1: Install the packages
Login to your remote server and install the python, postgresql, and nginx packages using the following commands.
sudo yum updatesudo yum install python3-pip python3-devel python3-virtualenv postgresql-server postgresql-devel postgresql-contrib gcc nginx
Step2: Configure PostgreSQL database
First, for setting up a PostgreSQL instance, run the following command.
sudo /usr/bin/postgresql-setup --initdb
Next, start PostgreSQL with systemctl.
sudo systemctl start postgresqlNow, create a database and user.
sudo su - postgrespsqlCREATE DATABASE djangoapp;CREATE USER djangouser WITH PASSWORD 'password123';GRANT ALL PRIVILEGES ON DATABASE djangoapp TO djangouser;ALTER ROLE djangouser SET client_encoding TO 'utf8'; ALTER ROLE djangouser SET default_transaction_isolation TO 'read committed'; ALTER ROLE djangouser SET timezone TO 'UTC';\q
Next, we need to make changes to the client authentication file “pg_hba.conf“. By default, it allows connections only when the system user matches the database user.
sudo nano /var/lib/pgsql/data/pg_hba.confScroll down and replace ident with md5 in the host column.

Now, restart the service and enable it so that it can start automatically at boot.
sudo systemctl restart postgresql
sudo systemctl enable postgresql
Step3: Clone the repository and create a virtual environment
First, we will clone our project from the Github repository in a directory.

Now, create a virtual environment with the following command.
virtualenv venvActivate the virtual environment with the following command.
source venv/bin/activate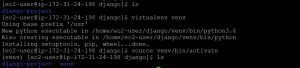
Next install Django, Gunicorn, and psychopg2 packages in the virtual environment.
pip3 install django gunicorn psycopg2Step4: Configure Django Project
Go to the settings.py file in your project and open it.
sudo vi settings.pyFind the database block and replace the default database SQLite with the PostgreSQL database that we have created.
DATABASES = {
    'default': {
        'ENGINE': 'django.db.backends.postgresql_psycopg2',
        'NAME': 'djangoapp',
        'USER': 'djangouser',
        'PASSWORD': 'password123',
        'HOST': 'localhost',
        'PORT': '',
    }
}
Next, include domain name or server IP associated with your Django server in ALLOWED_HOSTS.
ALLOWED_HOSTS = ['Domain_Name_or_IP', 'localhost']Now close the file and install the required packages and dependencies with the following command.
pip3 install -r requirements.txt
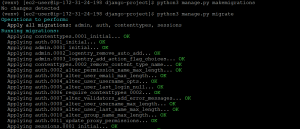
Run the following commands to migrate the initial database schema to our PostgreSQL database.
python3 manage.py makemigrations
python3 manage.py migrate
Run the following command to create an admin user.
python3 manage.py createsuperuser

Run the following command to collect static content into configured directory location.
python3 manage.py collectstatic
![]()
Now, test your project by starting up the Django development server with the following command.
python3 manage.py runserver 0.0.0.0:8000
Go to your browser, and make sure you can access your application with public IP on port 8000. Make sure you have allowed traffic on port 8000.
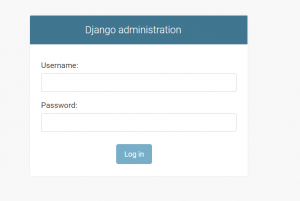
By appending /admin to your URL you can access the default Django admin interface. The credentials for login to the admin interface are those that we created using createsuperuser command.
Now we will test if Gunicorn can serve the application. Run the following command in your project directory to load the project’s WSGI module.
gunicorn --bind 0.0.0.0:8000 myproject.wsgi
You should be able to access your application from the browser. Make sure to replace the WSGI module in command with the WSGI module of your project.
Now get out of the virtual environment with the following command.
deactivate
Step5: Create Gunicorn socket and service files
First, we will create a Gunicorn socket so that when a connection occurs, the system will automatically start the Gunicorn process to handle the connection.
Create a gunicorn.socket file using the following command.
sudo vi /etc/systemd/system/gunicorn.socket
Copy the following code block and paste it into the file.
[Unit]
Description=gunicorn socket

[Socket]
ListenStream=/run/gunicorn.sock

[Install]
WantedBy=sockets.target
Now we will create a system service file for gunicorn.
sudo vi /etc/systemd/system/gunicorn.service
Paste the following code block in the file.
[Unit]
Description=gunicorn daemon
Requires=gunicorn.socket
After=network.target

[Service]
User=ec2-user
Group=ec2-user
WorkingDirectory=/home/ec2-user/django/django-project
ExecStart=/home/ec2-user/django/venv/bin/gunicorn \
          --access-logfile - \
          --workers 3 \
          --bind unix:/run/gunicorn.sock \
          myproject.wsgi:application

[Install]
WantedBy=multi-user.target
Replace the working directory and users, and wsgi module in the file accordingly.
Start and enable to gunicorn socket.
sudo systemctl start gunicorn.socket
sudo systemctl enable gunicorn.socket
Step6: Configure Nginx
Open the Nginx configuration file.
sudo nano /etc/nginx/nginx.confAdd a new server block, just above the default block.
server {
    listen 80;
    server_name server_domain_or_IP;

    location = /favicon.ico { access_log off; log_not_found off; }
    location /static/ {
        root /home/ec2-user/djangp/django-project;
    }

    location / {
        proxy_set_header Host $http_host;
        proxy_set_header X-Real-IP $remote_addr;
        proxy_set_header X-Forwarded-For $proxy_add_x_forwarded_for;
        proxy_set_header X-Forwarded-Proto $scheme;
        proxy_pass http://unix:/run/gunicorn.sock;
     }
}
Start and enable Nginx.
sudo systemctl start nginxsudo systemctl enable nginx
Now access your application from the browser with either your domain name or server IP.
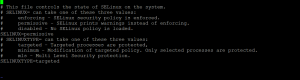
If you get a Bad Gateway error, it’s because of Selinux. For this, we can change the Selinux state in the Selinux configuration file.
vi /etc/sysconfig/selinuxChange the value of SELinux to permissive and reboot your system. You will now be able to access you application.
We now have a Django application running with Gunicorn WSGI server and Nginx web server.
Please contact with our Virtual CTO Services in India if you have anything related to cloud infrastructure, IT Staff Augmentation Services, Hire Developers in India or software architecture consulting to be discussed.
