

What is a pod?
A pod is smallest unit of deployment in Kubernetes, the containers you deploy on Kubernetes are wrapped in pods ,each pod may have more than one container , so when you want to run an application in Kubernetes you will write a yaml file typically called as a manifest file and deploy your application on the Kubernetes cluster using kubectl commands which will deploy your containerized application wrapped in pod(called as a deployment) and you can create multiple replicas of this pod by just mentioning the count in the deployment file .
A Deployment is responsible for keeping a set of pods running, pods are ephemeral by nature, even an if a pod fails Kubernetes can automatically create a new replica of that pod to continue operations.
Cluster IP is most common service type used, Kubernetes will assign a cluster-internal IP address to Cluster IP service, this makes the service only available within the cluster, you cannot connect to service (pods) from outside the Kubernetes cluster.
Node Port is an open port on every node of your cluster, Kubernetes transparently routes incoming traffic on the NodePort to your service, this is an extension of Cluster IP service. A Cluster IP Service, to which the NodePort Service routes, is automatically created, you can contact the NodePort Service, from outside the cluster, by requesting <NodeIP>:<NodePort>.
LoadBalancer service is an extension of NodePort service, NodePort and Cluster IP Services are automatically created when you request for a load balancer to which the external load balancer routes traffic to, it exposes the Service externally using a cloud provider’s (AWS, GCP, Azure) load balancer.
In this blog we will create a deployment (deploying nginx webserver) and a service (Node port) for that deployment using yaml configuration files, below is the deployment.yaml file which deploys 2 replicas of ngins web server, and service.yaml file to allow traffic from outside to access the webserver at port 32000 on the node.

Lets understand these configuration files line by line
apiVersion: v1                     apiVersion: v1
kind: Deployment                   kind: Service
the first two lines is declaring what you want to create, here we are creating deployment and a service , for each component there is a different api version .
metadata:                                       metadata:
  name: nginx-deployment                          name: nginx-service
Every configuration file in Kubernetes has 2 parts, first part is meta data of components, here the meta data is name of the component itself
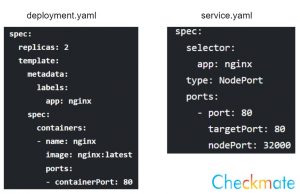
Specification
the second part in configuration file is specification where you basically put every kind of configuration that you want to apply for that component of deployment, and you will give the attributes that are specific to the kind of a component that you are creating service/deployment.
as you can see in the specification part of deployment.yaml, it has a block named template and this template also has its own meta data and specification, this part of configuration under template is applied to a pod , a pod should have its own configuration in a deployment configuration file , this will be the blueprint for a pod like which image it should be based on which port it should open what will be name of the container and all other details.
First let’s create a deployment and a service and then understand the specification part of service configuration file.
Deploying pods on Kubernetes Cluster
As we have understand how to write deployment file and a service file and how they are connected using labels and selectors, let’s deploy nginx webserver on the Kubernetes cluster, use below given commands to get the status of your cluster and nodes.
kubectl cluster-info
kubectl get nodes

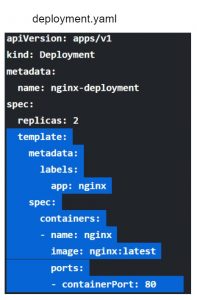
Copy below syntax on your master node terminal and click enter or create a yaml file (nginx.yaml/deployment.yaml) copy the highlighted part of below syntax in the yaml file and save it , use “kubectl apply -f xxxx.yaml” xxxx.yaml should be replaced by your yaml file name .
cat <<EOF | kubectl apply -f -
apiVersion: apps/v1
kind: Deployment
metadata:
  name: nginx-deployment
spec:
  replicas: 2
  template:
    metadata:
      labels:
        app: nginx
    spec:
      containers:
      - name: nginx
        image: nginx:latest
        ports:
        - containerPort: 80
EOF
And use command “kubectl get pods” to check the status of the deployment/pods.

Creating a Service
Now let’s create a service of type NodePort, create file named service.yaml (you can use any name for your file need not be “service”) copy below given syntax and save it.
apiVersion: v1
kind: Service
metadata:
  name: nginx-service
spec:
  selector:
    app: nginx
  type: NodePort
  ports:
    - port: 80
      targetPort: 80
      nodePort: 32000
Now use below given command to apply the configuration and create a NodePort/expose deployed application for external traffic, for the pods you deployed in previous step.
kubectl apply -f service.yaml
replace service.yaml with your file name

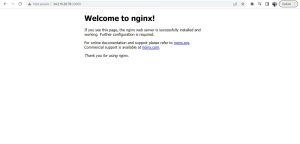
Now go on to the browser and give <IP-address>:32000 (IP address of the worker node on which pods are deployed)
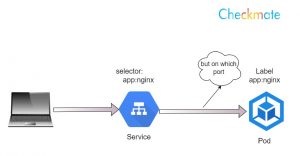
How service routes traffic to deployment?
In previous step we have created a deployment and a service, and we are able to access our deployment from the browser, but how these both are connected?
it’s simply done using labels and selectors.
Labels are key/value pairs attached to objects you can label each and every object in Kubernetes
Selectors are nothing but selecting objects using the labels i.e., selecting objects with same label to make a group, you cannot have a selector without a label, so if you want to group a particular set of objects all those set of objects should have the same labels, for example if you want to select a set of pods as a backend to an application all of them should have same label.
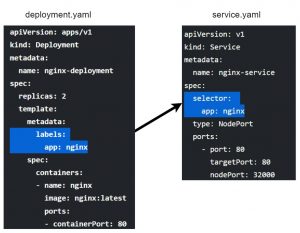
In deployment.yaml we are labeling our pods with a key/value pair app:nginx and in the service.yaml a selector is being used and the same label is given to it as in the deployment.yaml file ( app:nginx) , so whenever someone access this service it will check the labels and routes the traffic to the pods with the same label.
How to declare ports in service configuration file?

As show in the above image we are exposing our application(nginx) at port :80 by declaring – containerPort as 80 under ports: in deployment.yaml file, and in service.yaml file targetPort: 80 is the container port number on which we have exposed our application on, and – port: 80 is the external port , as mention initially in this blog we created a service of type NodePort and using port:32000 for this , even if you do not mention any port number ,Kubernetes will choose any random port from node-port IP range( 30,000 t0 32,767)
Please contact our software engineering team for any Cloud DevOps infrastructure management services website, LinkedIn
