

Cockroach DB is an elastic SQL database described as “almost impossible” to take down and used for modern applications, It is developed by Cockroach Labs and it’s designed to store copies of data in multiple locations/stores in order to enable speedy access for the users ,you can easily add or remove a node to Cockroach DB cluster and it’s easy to scale a Cockroach DB cluster from a single node on your laptop to thousands of server nodes, In this blog let’s install Cockroach DB on three nodes and create a cluster.
Install Cockroach DB on all the Nodes
sudo yum install curl tar -y
Execute below given command to download the Cockroach DB archive for Linux and its supporting libraries, and then copy the binary into /usr/local/bin/ so you can execute cockroach commands from any shell.
sudo curl https://binaries.cockroachdb.com/cockroach-v22.1.6.linux-amd64.tgz | tar -xz && sudo cp -i cockroach-v22.1.6.linux-amd64/cockroach /usr/local/bin/

CockroachDB uses custom-built versions of the GEOS libraries, it is an open-source geometry library used by CockroachDB, by default, CockroachDB looks for external libraries in /usr/local/lib/cockroach , so create a folder named cockroach at /usr/local/lib and copy libgeos.so, libgeos_c.so to it, use below given commands to do this.
sudo mkdir -p /usr/local/lib/cockroach
sudo cp -i cockroach-v22.1.6.linux-amd64/lib/libgeos.so /usr/local/lib/cockroach/
sudo cp -i cockroach-v22.1.6.linux-amd64/lib/libgeos_c.so /usr/local/lib/cockroach/
Now use below given command on your terminal to check the installation.
cockroach demo
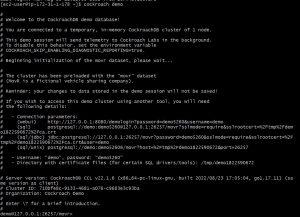
use command exit to come out of the shell, once you are done with the installation on all the nodes follow the next steps for creating a cluster.
Configuring Name Resolution for Cluster Nodes
Configuring Name resolution is very important while setting up a cluster, because, if a node is unable to resolve the hostname of the other nodes it will give an error while initializing a cluster, I am configuring the local DNS resolver for hostname resolution of the cluster nodes.
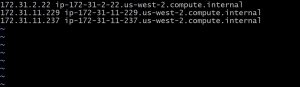
Edit /etc/hosts file on all nodes and give your node IP addresses and hostnames as shown in below given snapshot, do it on all the nodes.
Setup Cockroach DB Cluster
Generate Certificates for secure connections
Configuration of Cockroach DB cluster in Insecure mode is very simple but it does not perform any encryption of inter-cluster communication, but secure mode uses certificates to enforce encryption of inter-cluster communication and authorization, first create a Certificate Authority-(CA-key), this will be used to digitally sign certificates that you will generate for configuring your Cockroach DB secure cluster
Create two directories “certs” and “my-safe-directory” on all the nodes,use certs to store CA certificate and all node and client certificates and keys, use my-safe-directory to keep your CA key and then reference the key when generating node and client certificates.
mkdir {certs,my-safe-directory}
Configure First Node
Now use the following cockroach command to create a certificate authority certificate and a key on the first node.
cockroach cert create-ca \ --certs-dir=certs \ --ca-key=my-safe-directory/ca.key
Generate a certificate for 2nd CockroachDB node using the following command on node one , use your node’s IP address, hostname here
cockroach cert create-node \
  172.31.2.22  \
  ip-172-31-2-22.us-west-2.compute.internal  \
  127.0.0.1 \
  localhost \
  --certs-dir=certs \
  --ca-key=my-safe-directory/ca.key

Here 172.31.2.22 is my 2nd node IP and ip-172-31-2-22.us-west-2.compute.internal is its hostname ,please replace them with your node details, once the certificates are generated, copy the certs folder on to the 2nd node certs folder (CA certificate, node certificate and key) from node cert folder, and after copying use below given command on the first node to remove them and create certificates for first node.
rm certs/node.crt certs/node.key
as the certificate and keys are copied to the second node and you have to generate it for the first node, use the same command on the first with 3rd node node IP and hostname and copy them on to node 3 then use “rm certs/node.crt certs/node.key” to delete them on node one, and finally use the cockroach create command on node one to generate the certifiacte.
Now move the certs directory to the cockroach directory (“/var/lib/cockroach”)on each CockroachDB node and change the ownership of Cockroach directory to the user cockroach
sudo mkdir /var/lib/cockroach
sudo cp -rv certs /var/lib/cpckroach
sudo useradd cockroach
sudo chown -R cockroach.cockroach /var/lib/cockroach/
Configure Systemd Service for Cockroach DB
To enable auto-start of CockroachDB server during Linux startup, you are required to create a systemd service unit, do the following on all the CockroachDB nodes.
Create a systemd service unit file.
vi /etc/systemd/system/cockroachdb.service
vi is a editor here
[Unit]
Description=Cockroach Database cluster node
Requires=network.target
[Service]
Type=notify
WorkingDirectory=/var/lib/cockroach
ExecStart=/usr/local/bin/cockroach start --certs-dir=certs --advertise-addr=ip-172-31-11-237.us-west-2.compute.internal --join=ip-172-31-2-22.us-west-2.compute.internal,ip-172-31-11-229.us-west-2.compute.internal, --cache=.25 --max-sql-memory=.25
TimeoutStopSec=60
Restart=always
RestartSec=10
StandardOutput=syslog
StandardError=syslog
SyslogIdentifier=cockroach
User=cockroach
[Install]
WantedBy=default.target
Repeat creating the systemd file on each node and you need to replace the –advertise-addr with the hostname of the CockroachDB node on which you are creating this systemd service and then start CockroachDB service using below given command.
sudo systemctl start cockroachdb
Then check the status of the service on each Node.
sudo systemctl status cockroachdb

Before initializing the cluster open the required ports, 26257/tcp is CockroachDB default service port for SQL interface, execute the below given commands on each node.
sudo yum install firewalld -y
sudo systemctl enable --now firewalld
sudo firewall-cmd --permanent --add-port={8080,26257}/tcp
sudo firewall-cmd --reload

Initialize CockroachDB Cluster
As all the required configuration is done intialize cockroachDB cluster using below given command.
cockroach init --certs-dir=certs --host=<address of any node>
cockroach init --certs-dir=certs --host=localhost:26257
Replace host value with address of any Node, and if the cluster is initialized successfully, you will get a success message as given below.

Please Contact our technical team for any offshore infrastructure management services website, LinkedIn
