
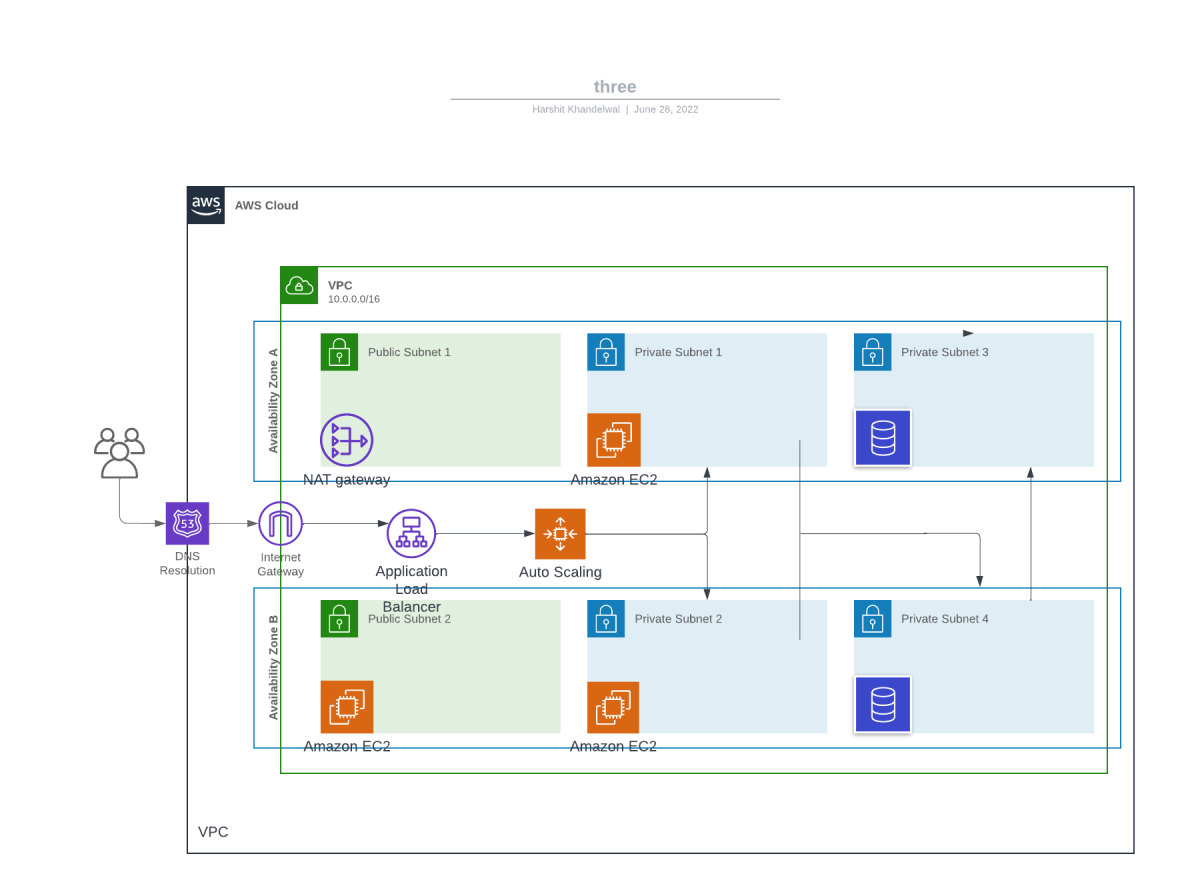
The three-tier architecture, which includes the presentation tier, application tier, and database tier, is the most often used implementation of a multi-tier architecture in AWS cloud or any other cloud platform.
The presentation layer is with which end-users interact. The application layer contains the code or logic. It interacts with the presentation and data layer to respond to client requests. The database layer manages the data. The three-tier architecture helps in creating a secure, scalable and highly available infrastructure for your software product.
We will use to following steps to create a three-tier architecture on AWS cloud.
Step1: Create networking resources
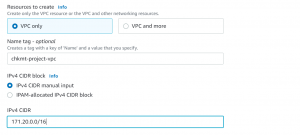
- Login to your AWS account and go to the VPC dashboard and click Create VPC and select VPC only.
- Give a name to the VPC and enter the CIDR block and click Create VPC.
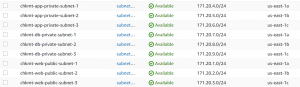
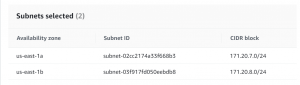
- Next, we have to create subnets. We will create one public subnet and two private subnets in each of the 3 availability zones. The public subnet will be for our presentation layer, and the private subnets will be for the application and database layer. Enable auto-assign public IP address for public subnets.
- Now create an Internet Gateway, using which resources in VPC can communicate with the internet. Click internet gateways->create internet gateway. Give a name and tag to it.

- Next, we will create a NAT Gateway. Instances in a private subnet can connect to services outside VPC using a NAT gateway, but external services cannot connect directly to those instances.
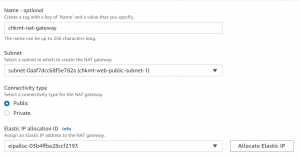
- Click on NAT gateway-> Create NAT gateway. Give a name and tag. NAT gateway is associated with a public subnet so select a public subnet from VPC. Select connectivity type as public and allocate an elastic IP to it.

- Now we will create 3 route tables, one for each tier. Associate public subnets to the first route table, private subnets for the application tier to the second route table, and private subnets for the database tier to the third route table.

- Next, add a route to the internet through the internet gateway in route table for public subnets.

- Add a route to the internet through NAT gateway in route tables for the private subnets.

Step2: Create bastion host
- A Bastion host is a server or instance that has been configured specifically to work against threats or attacks. It is also referred to as the “jump server” since it functions as a proxy server and enables connections between client machines and remote servers. Essentially, it serves as a gateway to the public internet.
- Go to create instance, and select AMIand instance type.
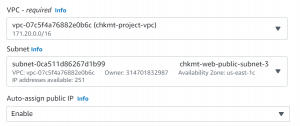
- We have to select the VPC that we created and use the public subnet.
- Enable Auto-assign public IP.
- Create Security Group and allow SSH traffic from your trusted IP.
- Click Launch Instance.
Step3: Create Autoscaling-Group, Application Load Balancer and launch instances
- First, we will create two security groups in our VPC, one for the application load balancer and one for application ec2 instances.
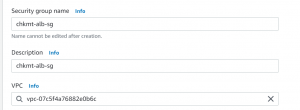
- Go to Security Groups-> Create Security Groups.
- First, for the load balancer security group, give the name and select the VPC that we created.
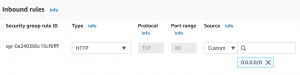
- Open port 80 to receive traffic from the internet and create security group.
- Create another security group for application instances.

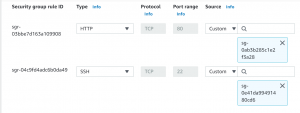
- Add an inbound rule allowing traffic on port 80 from load balancer security group.
- Next, add another inbound rule allowing traffic on port 22 from the jump server security group.
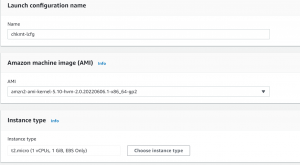
- Now, we have to create a launch configuration for the auto-scaling group.
- Go to Launch Configurations->Create Launch Configuration.
- We will use Amazon Linux AMI and t2.micro instance for our instance.
- Under Advanced details in user data, we will write a script to start an apache web server.
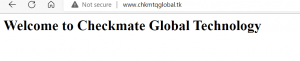
#!/bin/bash
yum update -y
yum install -y httpd
systemctl start httpd
systemctl enable httpd
echo "<html><body><h1>Hi!! Welcome to Checkmate Global Technologies</h1></body></html>" > /var/www/html/index.html
- Select the application security group that we created earlier, select or download the key pair file and click create launch configuration.

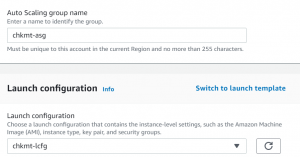
- Next, we will create an Auto-scaling group.
- Go to Auto Scaling Groups->Create an auto-scaling group.
- Give a name, and select launch configuration.
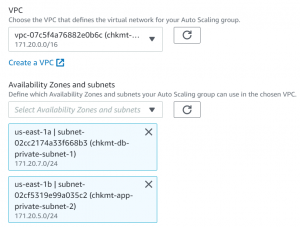
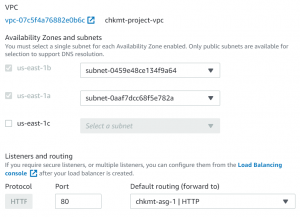
- Select VPC and Private Subnets. The instances created will be in the private subnet.
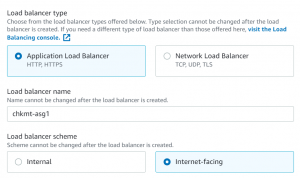
- Next, we will attach a load balancer.
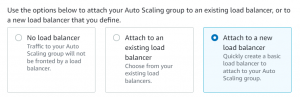
- Select the load balancer type as Application Load Balancer.
- Make load balancer internet-facing and make sure the right VPC and public subnets are selected and select auto-scaling group in targets.
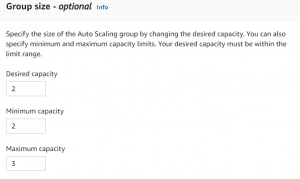
- Next select group size and scaling policies.
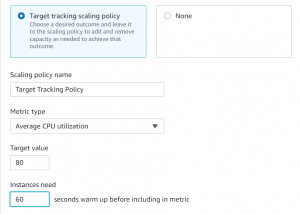
- We have added a scaling policy such that if CPU utilization reaches 80% for a period of more than 60 seconds a new instance will be added.
- Review and click create autoscaling group.
Step3: Create RDS instance
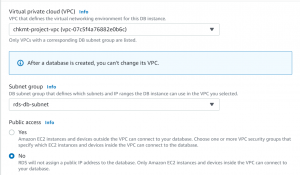
- Go to the RDS dashboard. First, we will create a DB subnet group. Click Subnet groups.
- Give a name to the subnet group and select the VPC.
- Select the AZ and private subnets.
- Next, click create database.
- We will select the MYSQL database and t2.micro instance in the free tier.
- Create a username and password.
- Select VPC and the subnet group that we created.
- Now, click create database.
- Next, go to the security group of the database and click edit inbound rules.
- Delete the default rule and add a rule allowing traffic on port 3306 from the application security group.

Step4: Checking connectivity with application and database server
- For connecting to our application, paste the load balancer dns name in your browser, and you should be able to access your application.

- Our database server is in a private subnet, so to connect to it we will use the jump server and application server.
- First copy the keypair file of the application server in the jump server.
- Connect to your jump server with SSH command.
- Now SSH to the application server from the jump server with the help of the key pair file that you copied.
- To check the connectivity of the application server with port 3306 of the database server we will use the telnet command. First, open port 23 of the database server.
- Install telnet in the application server with the following command.
sudo yum install telnet
- Use the following command to check connectivity with telnet.
telnet 'ip or dns' 'port number'

- Close port 23 of the database server.
Step5: Map load balancer endpoint to the domain name using Route53
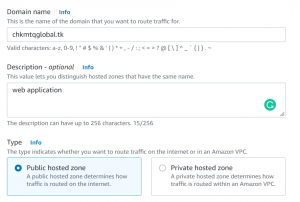
- Go to Route53 dashboard and click create hosted zone.
- Write your domain name and select type as public hosted zone.
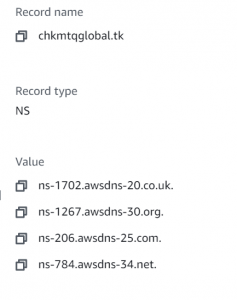
- Copy the nameservers from NS record.
- Go to your hosting provider and replace default nameservers with the nameservers from Route53.

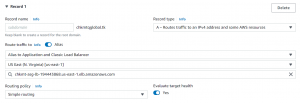
- Click on create record. Select record type as A record.
- Select alias as the load balancer, choose your region, and paste the dns name.
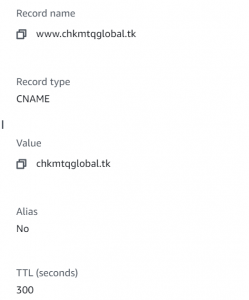
- Create a CNAME record and map domain with www to without it.
- We have set up our three-tier architecture. We can access our application using the domain name.
Please contact with our cloud consultants if you want to onboard cloud automation in your cloud operations. Please reach out to our engineering director to hire experienced google cloud engineer.
