

Terraform is an open-source infrastructure as code tool to automate and manage your cloud infrastructure, it uses a declarative language means you just give what you want and terraform will take care of the steps to get it done, you can version, reuse, and share these files, in this blog we will learn how to launch an ec2 instance in AWS using terraform configuration files.
I am going to use an already launched AWS ec2 instance to launch a new instance with terraform, for this the instance used should have permission to do the same which can be done by attaching a IAM role to the instance
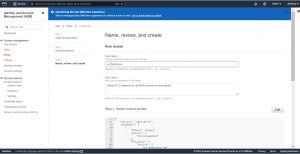
Step-1: Creating IAM role with AmazonEC2FullAccess to Launch AWS ec2 instances.
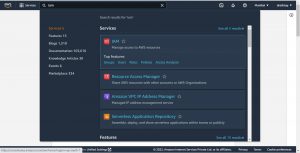
Create a IAM role and with policy AmazonEC2FullAccess, on your AWS web console search for IAM.
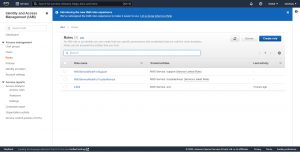
on the left plane click on Roles under Access management then click on create role.
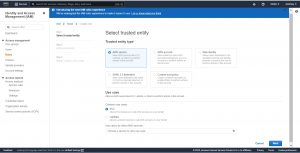
Select “AWS” service for “Select type of trusted entity” , EC2 for “Choose a use case” then click on next.
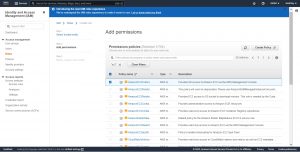
search for AmazonEC2FullAccess policy and select it and click “Next”
then give a meaningful name for the role you are creating, check the details add tags if required scroll down and click on “create role”
Check this blog to know the steps for launching a ec2 instance , and use below commands to install terraform
Installing Terraform
execute below command to install yum-config-manager
sudo yum install -y yum-utils
your machine may not have terraform repository add it using yum-config-manager, use below commands for this
sudo yum-config-manager --add-repo https://rpm.releases.hashicorp.com/RHEL/hashicorp.repo

Execute below command to install terraform
sudo yum -y install terraform
Attaching IAM role to ec2 instance
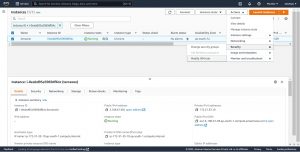
Go to your ec2 instances select the instance which has terraform installed in it.
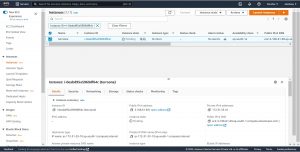
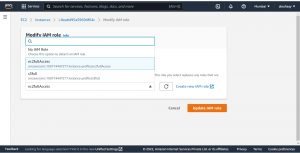
Click on Security under Actions and click on modify IAM role.
Select the IAM role that you have created and click on Update IAM role
Step-3: Create Terraform files to launch an ec2 instance
All the terraform files should be saved with “.tf” extension like “provider.tf”, syntax used in terraform configuration files in this blog is called as HashiCorp Configuration Language , HCL is human readable and machine friendly, terraform can also read JSON configurations.
On your ec2 instance create a folder for your Terraform files and navigate to it, use below commands on your terminal.
mkdir project-ec2
cd project-ec2
mkdir is a command used to create directories
cd is used to change the working directory.
we will create 3 files variable.tf, provider.tf, main.tf, follow below process.
create variable.tf and copy below code to the file, please change the highlighted things as per your requirements and changing the value of variable key_name is must as key1 is the name of the key pair that I already have.
variables.tf
variable "aws_region" {
  description = "AWS region in which I want to deploy resources."
  default = "ap-south-1"
}

variable "key_name" {
  description = " credentials keys to connect to ec2 instance"
  default = "key1"
}

variable "instance_type" {
  description = "instance type for ec2"
  default = "t2.micro"
}

variable "security_group" {
  description = "Name of security group"
  default = "my-Securitygroup"
}

variable "tag_name" {
  description = "Tag Name of for Ec2 instance"
  default = "my-ec2-instance"
}
variable "ami_id" {
  description = "AMI ID for RHEL Ec2 instance"
  default = "ami-05c8ca4485f8b138a"
}
variable.tf file where you will give all the details that you will use to launch a instance like ami, region ,security group, instance type, tags ,you can also give this details directly in the implementation file where you declare the resources you want to deploy but its not recommended to hard code all the details, creating a separate variable file helps easily change the configuration any time with out modifying the main implementation file.
As you can see above syntax each input variable must be declared with a variable block and name for variable is given after the key word variable ,each variable name must be unique, description and default are arguments I used for variable declaration.
description : is basically like a documentation for the variable.
default: when given as default variable is considered as optional and only used if no value is given when running terraform.
Now create a file named provider.tf and copy below given syntax to it and save.
provider.tf
provider "aws" {
  region = var.aws_region
}
Here I gave details of provider(AWS) and the AWS region where I want to deploy resources , Terraform uses plugins to communicate with cloud providers and other API’s to deploy resources, here we are giving details of which plugin to use, below main.tf is the main implementation file to launch where I declared all the resources to be deployed.
then create a file main.tf here you will declare the resources that you want to deploy, you can use any meaningful name but should be with extension .tf
main.tf
#Create security group with firewall rules
resource "aws_security_group" "securitygroup-1" {
  name = var.security_group
  description = "security group for instance"

#inbound
ingress {
  from_port = 8080
  to_port = 8080
  protocol = "tcp"
  cidr_blocks = ["0.0.0.0/0"]
 }

ingress {
  from_port = 22
  to_port = 22
  protocol = "tcp"
  cidr_blocks = ["0.0.0.0/0"]
 }

# outbound
egress {
  from_port = 0
  to_port = 65535
  protocol = "tcp"
  cidr_blocks = ["0.0.0.0/0"]
 }

tags= {
 Name = var.security_group
 }
}

#declaration to launch instance

resource "aws_instance" "myFirstInstance" {
  ami = var.ami_id
  key_name = var.key_name
  instance_type = var.instance_type
  security_groups= [var.security_group]
  tags= {
    Name = var.tag_name
  }
}
Let’s understand the resource block first.
resource “resource key word” “resource name to use across terraform module“{
here give your resource attributes required to provision it…..
}
resource key word: each resource in AWS will have a unique key word , for example “aws_instance” is key word for AWS EC2 instance use the keyword of the resource that you want to deploy.
resource name to use across terraform module: name you give here is only to use across terraform module, it has no scope out side the module.
In above given main.tf file I am creating a security group to attach it for the instance where I am opening ports 22,8080 to be accessed from any where[0.0.0.0/0] and outbound to any port starting from port 0(zero) to 65535 and giving a tag with key Name and value it is given from variable.tf file using var.security_group ,to use a variable declared in variable file use var.variable name.
Step-3: Terraform commands to deploy resources
After creating all 3 files , now use below commands to deploy your resources
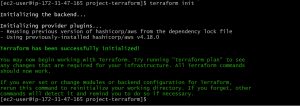
Use below command to initialize provider plugins.
terraform init
above command is you used to initialize a directory that containing terraform files, it initializes provider plugins ,This is the first command that you have to run after creating a new terraform file in your directory.
Terraform command to validate configuration files
terraform validate
terraform validate command will validate configuration files for syntactical errors.

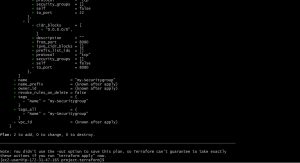
Command to check what resources are to be created
terraform plan
terraform plan will evaluate the desired state of resources declared and compares it with the current state in your infrastructure and give a complete output what it is going to do based on your configuration files , it does not create or destroy any resource it only gives the plan.
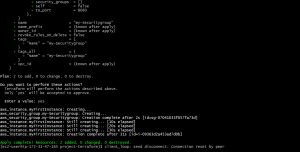
Command to deploy your Resources
terraform apply
terraform apply will do plan same as the terraform plan does and then carries out changes according to the plan using appropriate API’s for each resource, checks the details and press yes when it prompts as shown in below image.

sample final output for terraform apply will as given below if it’s successfully done.
Please contact with our technical consultants to discuss cloud infrastructure engineering and SaaS based product development strategies.
