

Magento is an open-source e-commerce platform used for CMS Development, E-commerce development and running online store. It is developed by Varian Inc. and written in PHP. In this blog, we will see how to install Magento on a Red Hat Linux Machine.
Steps to install Magento on Red Hat:
Step1: Check System Requirements
- For best performance, your server must have 4GB of memory.
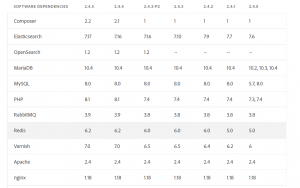
- Install the right version of software dependencies. The recommended versions of dependencies according to the Magento version are as below.
Step2: Install the Apache web server, MySQL database and PHP
- First, update the system.
sudo dnf install && sudo dnf upgrade
- Install httpd and MySQL with the following command.
sudo dnf install httpd mysql-server -y
- Enable both services to start at reboot.
sudo systemctl start mysqld httpd
sudo systemctl enable mysqld httpd
- Next, we need to install PHP and the required extensions. First, add EPEL and REMI repository.
sudo yum -y install https://dl.fedoraproject.org/pub/epel/epel-release-latest-8.noarch.rpm
sudo yum -y install https://rpms.remirepo.net/enterprise/remi-release-8.rpm
- Next, install PHP 7.4.
sudo dnf -y install dnf-utils
sudo dnf module reset php -y
sudo dnf module install php:remi-7.4
- Install the required PHP extensions.
sudo dnf install php php-cli php-soap php-pdo php-bcmath php-mysqlnd php-opcache php-xml php-gd php-intl php-mbstring php-json php-iconv php-zip unzip git -y
- After installing php, open the php.ini file and make following changes.
allow_url_fopen = On
short_open_tag = On
memory_limit = 512M
upload_max_filesize = 128M
max_execution_time = 3600
date.timezone = UTC
Step3: Create MYSQL database for Magento
- Use the following command to set the root password and secure your database.
sudo mysql_secure_installation
- Answer the questions that are prompted.
Enter current password for root (enter for none):
Set root password? [Y/n] Y
New password:
Re-enter new password:
Remove anonymous users? [Y/n] Y
Disallow root login remotely? [Y/n] Y
Remove test database and access to it? [Y/n] Y
Reload privilege tables now? [Y/n] Y- Login to MYSQL and create a user for Magento.
mysql -u root -p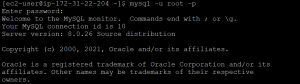
CREATE USER 'magento2'@'localhost' IDENTIFIED BY 'password';
ALTER USER 'magento2'@'localhost' IDENTIFIED WITH mysql_native_password BY 'password';
GRANT ALL PRIVILEGES ON *.* TO 'magento2'@'localhost' WITH GRANT OPTION;
exit

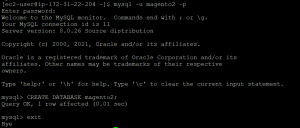
- Now create a database.
mysql -u magento2 -p
CREATE DATABASE magento2;
exit
Step4: Install and configure Elasticsearch
- Elasticsearch requires Java, so we will first install it. Use the following commands to install Java.
sudo wget https://download.oracle.com/java/17/latest/jdk-17_linux-x64_bin.rpm
sudo rpm -Uvh jdk-17_linux-x64_bin.rpm
java -version

- Now for installing elasticsearch, add the following repo.
cat <<EOF | sudo tee /etc/yum.repos.d/elasticsearch.repo
[elasticsearch-7.x]
name=Elasticsearch repository for 7.x packages
baseurl=https://artifacts.elastic.co/packages/oss-7.x/yum
gpgcheck=1
gpgkey=https://artifacts.elastic.co/GPG-KEY-elasticsearch
enabled=1
autorefresh=1
type=rpm-md
EOF
- Now clear and update the Yum package index.
sudo yum clean all
sudo yum makecache
- Next, install elasticsearch using following command.
sudo yum -y install elasticsearch-oss
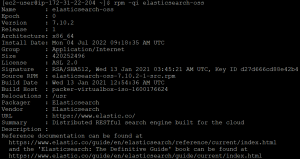
- Confirm installation with the following command.
rpm -qi elasticsearch-oss
- Now to configure elastic search open the configuration file.
sudo nano /etc/elasticsearch/elasticsearch.yml
- Uncomment the network host line and make its value to 0.0.0.0 to make it publicly available. Make it 127.0.0.1 to make it available only to your machine.
- Uncomment http port line.

- Uncomment discovery.seed_hosts line and make its value 127.0.0.1.

- To set JVM options like memory limits open the following file.
sudo nano /etc/elasticsearch/jvm.options

- Use less megabytes of memory if your system has less memory.

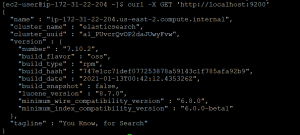
- Use the following command to test if elasticsearch is working or not.
curl -X GET 'http://localhost:9200'
- You will get the following output if elasticsearch is working.
Step5: Install composer
- Use the following command to download the Composer.
curl -sS https://getcomposer.org/installer -o composer-setup.php
- Use the following command to install Composer.
sudo php composer-setup.php --install-dir=/usr/bin --filename=composer
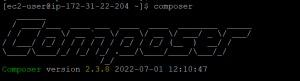
- Check the version with the following command.
composer
Step6: Install Magento2
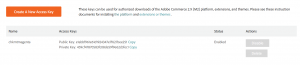
- Create an account to Magento2 marketplace and create an access key.
- Go to the following directory.
cd /var/www/html
- Use the following command to create Magento open source project.
sudo composer create-project --repository-url https://repo.magento.com/ magento/project-community-edition <install-directory-name>
- Enter public key for username and private key for password.

- Now we have to set the required ownership and permission for files and directories. For that first we will create a user and add that user to web server group.
sudo adduser "magento"
sudo passwd "magento"
sudo usermod -a -G "apache" "magento"
sudo systemctl restart httpd.service
- Now set the required permissions with following commands.
cd /var/www/html/'magento install directory'
sudo find var generated vendor pub/static pub/media app/etc -type f -exec chmod g+w {} +
sudo find var generated vendor pub/static pub/media app/etc -type d -exec chmod g+ws {} +
sudo chown -R magento:apache .
sudo chmod u+x bin/magento
- Use the following command in the Magento directory to install Magento.
php bin/magento setup:install--base-url=<your-domain>--db-host=localhost--db-name=magento2--db-user=magento2--db-password=<your-db-password-of-magento2-user>--admin-firstname=Admin--admin-lastname=Admin--admin-email=admin@admin.com--admin-user=admin--admin-password=<your-admin-password>--language=en_US--currency=USD--timezone=America/Chicago--backend-frontname=admin--use-rewrites=1--search-engine=elasticsearch7--elasticsearch-host=localhost--elasticsearch-port=9200
![]()

- Next, create httpd host file.
sudo vi /etc/httpd/conf.d/magento.conf
-
- Copy and paste following code there.
ServerAdmin admin@example.com
ServerName magento2.example.com
DocumentRoot /var/www/html/magento/pub
DirectoryIndex index.php


Options Indexes FollowSymLinks MultiViews
AllowOverride All
Order allow,deny
allow from all


ErrorLog /var/log/httpd/magento_error.log
CustomLog /var/log/httpd/magento_access.log combined
- Restart httpd service.
sudo systemctl restart httpd
-
- Now navigate to the Magento root directory and execute the following commands.
- For production mode use following command.
sudo php bin/magento deploy:mode:set production
sudo php bin/magento cache:flush
- For development, mode use the following command.
sudo php bin/magento deploy:mode:set developer
sudo php bin/magento cache:flush
- Use following commands to update database and deploy static files.
sudo chmod -R 777 var pub/static generated generated/
sudo php bin/magento indexer:reindex
sudo php bin/magento setup:upgrade
sudo php bin/magento setup:static-content:deploy -f
sudo php bin/magento cache:flush
- Run following command to install Magento cron jobs.
sudo bin/magento cron:install
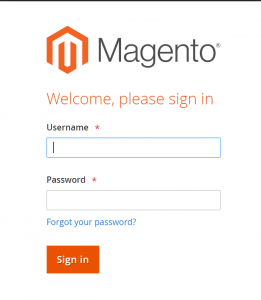
- Go to your browser and access Magento with the server name.

- Use the following command in the Magento root directory to disable two-factor authentication for admin login.
sudo php bin/magento module:disable Magento_TwoFactorAuth
- Access admin panel with following url.
http://server_name/admin
Author Details
This blog is written by M/S Checkmate global Technologies software development team. Please reach out to our technical consultant to hire experienced magento developer.
