

Puppet is a configuration management tool that is used for automating configuration management, automating daily repeated tasks for IT operation management and deployments. When using Puppet, you specify the ideal condition for the infrastructure systems that you want to manage. Writing infrastructure as a code in Puppet’s Domain-Specific Language (DSL) which works with a wide range of hardware and operating systems, is how you accomplish this. Puppet code is declarative, so you define the final state you want your systems to be in rather than the actions necessary to get there. After then, Puppet automates the procedure for putting these systems in that state and maintaining them in that state. With the use of SSL, Puppet’s Master-Slave architecture allows the Master and Slave to communicate over a private, encrypted channel. Puppet can be used to manage cloud operations tasks such as operating system configuration file management, server (web/database/application) management, monitoring file configuration, operating system post/pre reboot sanitary checks, package deployment, etc. A configuration management tool can save DevOps engineers time by automating numerous other production operations.
In this blog, we will see how to install puppet on master and client nodes. We will use one master and one client node as mentioned follow.
Step 1: Set up hostnames for the master and client-server.
- First, we will set the hostname for the master server.
sudo hostnamectl set-hostname puppetmaster.chkmt.com
- Now login to the client-server and set the hostname.
sudo hostnamectl set-hostname puppetclient.chkmt.com
- Now open the /etc/hosts file in both the master and client machine and copy the following there.
[master-server IP] puppetmaster.chkmt.com puppetmaster
[client-server IP] puppetclient.chkmt.com
Step 2: Install puppet master
- Now we will install puppet master on the master node. First, add and enable the yum repository. For adding a repository for other Linux distributions visit this link.
sudo rpm -Uvh https://yum.puppet.com/puppet6-release-el-8.noarch.rpm

- Check that the repository is added.
sudo yum repolist all
- Now install the puppet master.
sudo yum install puppetserver
- Now configure the jvm memory allocation. By default, it is set to 2GB. Change it according to your system resources.
sudo vi /etc/sysconfig/puppetserver

- Now modify the configuration file.
sudo vi /etc/puppetlabs/puppet/puppet.conf
- Add the following lines to the file.
[master]
dns_alt_names = puppetmaster,puppetmaster.chkmt.com

[main]
certname = puppetmaster.chkmt.com
server = puppetmaster.chkmt.com
runinterval = 30m
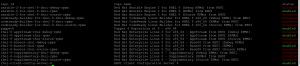
- Generate CA for puppet master.
source /etc/profile.d/puppet-agent.sh
puppetserver ca setup
![]()
- Allow traffic from port 8140 in the security group.
- If firewall service is enabled, add a rule for allowing traffic from port 8140.
firewall-cmd --permanent --add-port=8140/tcp
firewall-cmd --reload
- Start and enable the puppet server
sudo systemctl start puppetserver
sudo systemctl enable puppetserver
Step3: Install puppet agent
- Login to client-server and install puppet agent.
sudo rpm -Uvh https://yum.puppet.com/puppet6-release-el-8.noarch.rpm
sudo yum install puppet-agent- Open the puppet configuration file and paste the following code there.
sudo vi /etc/puppetlabs/puppet/puppet.conf
[main]
server = puppetmaster.chkmt.com
certname = puppetclient.chkmt.com
runinterval = 30m
- Start the puppet agent with the following command. Run the command as a root user.
source /etc/profile.d/puppet-agent.sh
puppet resource service puppet ensure=running enable=true

Step 4: Create CA certificate and sign certificate request
- First, run the following command from the client-server to initiate a connection.
puppet agent -t

- Now run the following command in the master server to sign the certificate request.
puppetserver ca sign --certname puppetclient.chkmt.com
- Run the following command to list the certificates.
puppetserver ca list --all

- Now run the following command on the client-server to test the connection.
puppet agent --testclass=”wp-block-code”>
Author Details:
This blog is written by Amit Kumar, Virtual CTO in India at Checkmate Management Consulting, Please contact with him to ensure Cloud infrastructure stability, optimal usages of cloud services, remote cloud support, cloud security posture assessment and infuse CICD pipeline best practices for faster go to market and IT Staffing Services in India.
