

What is kubeadm?
Kubeadm is a tool to set up Kubernetes cluster ,It is developed and maintained by the official Kubernetes community, it is a tool built to provide “kubeadm init” and “kubeadm join” considered as best practice “fast paths” for creating Kubernetes clusters.
kubeadm init command initializes a Kubernetes control-plane node by executing a number of steps like running pre flight checks, writing kubeconfig files, Apllying labels and taints to control plane , generating token that additional nodes can use to attach themselves to the master node as a worker node, Installing DNS server.
kubeadm join command downloads necessary cluster information from the API server and adds the worker node to the cluster
Note: A minimum of two nodes or more , one for master and one for slave , you can have as many worker nodes as required , Should have a minimum of 2 vCPU and 2GB RAM per machine.
Perform below given steps in all the Nodes
Start with updating your nodes
yum update -y
Allow traffic on required ports
Execute below commands to install and enable firewalld , do it on all the nodes.
yum install firewalld -y
systemctl enable --now firewalld
Execute below commands on master node
firewall-cmd --zone=public --permanent --add-port={6443/tcp,2379-2380/tcp,10250/tcp,10251/tcp,10252/tcp}
firewall-cmd --reload
Execute below commands on worker nodes
firewall-cmd --zone=public --permanent --add-port={10250/tcp,30000-32767/tcp}
firewall-cmd --reload
For kubeadm to work properly you have to disable swapp , execute below command on your terminal on all nodes
swapoff -a
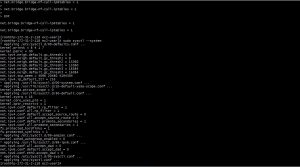
Make changes to the IP tables to see the bridged traffic on all nodes
cat <<EOF | sudo tee /etc/modules-load.d/k8s.conf
br_netfilter
EOF

cat <<EOF | sudo tee /etc/sysctl.d/k8s.con f
net.bridge.bridge-nf-call-ip6tables = 1
net.bridge.bridge-nf-call-iptables = 1
EOF
sudo sysctl --system
br_netfilter enables Virtual Extensible LAN (VxLAN) traffic for communication between Kubernetes pods across the cluster
sudo sysctl –system is a administrator command, loads settings from all system configuration files.
Install Container Runtime on All Nodes
before you install kubeadm you need a container run time up and running , I am using docker
yum install docker -y

Configure docker to use systemd
sudo mkdir /etc/docker
cat <<EOF | sudo tee /etc/docker/daemon.json
{
"exec-opts": ["native.cgroupdriver=systemd"],
"log-driver": "json-file",
"log-opts": {
"max-size": "100m"
},
"storage-driver": "overlay2"
}
EOF
Start and enable Docker
sudo systemctl enable docker
sudo systemctl daemon-reload
sudo systemctl restart docker
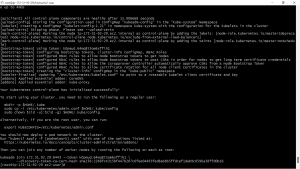
Installing kubeadm, kubelet and kubectl
Configure the package management system so that you can directly using yum on all the nodes.
 sudo tee /etc/yum.repos.d/kubernetes.repo
[kubernetes]
name=Kubernetes
baseurl=https://packages.cloud.google.com/yum/repos/kubernetes-el7-\$basearch
enabled=1
gpgcheck=1
gpgkey=https://packages.cloud.google.com/yum/doc/yum-key.gpg https://packages.cloud.google.com/yum/doc/rpm-package-key.gpg
exclude=kubelet kubeadm kubectl
EOF
Set Selinux in permissive mode
sudo setenforce 0
sudo sed -i 's/^SELINUX=enforcing$/SELINUX=permissive/' /etc/selinux/config
Setting SELinux in permissive mode by running setenforce 0, is required to allow containers to access the host filesystem.
Now execute below given command to install kubelet, kubeadm, kubectl.
yum install install -y kubelet-1.22.8-0 kubectl-1.22.8-0 kubeadm-1.22.8-0 --disableexcludes=kubernetes

enable kublet using below given systemctl command.
sudo systemctl enable --now kubelet

to make the kubelet functioning as expected you have to configure the cggroup drivers, create a file kube-config.yaml and save the below configuration in it.
# kubeadm-config.yaml
kind: ClusterConfiguration
apiVersion: kubeadm.k8s.io/v1beta3
kubernetesVersion: v1.21.0
---
kind: KubeletConfiguration
apiVersion: kubelet.config.k8s.io/v1beta1
cgroupDriver: systemd
Initializing Kubernetes Cluster
perform this step only on Master Node
Now we will initialize the cluster with the kudeadm -config file created in previous step we will also use ignore-preflight-error argument to ignore any warnings while initializing the cluster, run below commands only on only master node
kubeadm init --config kubeadm-config.yaml --ignore-preflight-errors=all
To start using your cluster, you need to run the following as a regular user (you can also get this ) to copy the kubernetes config files in desired location, you will also get this command from output of kube init command as given above snapshot.
mkdir -p $HOME/.kube
sudo cp -i /etc/kubernetes/admin.conf $HOME/.kube/config
sudo chown $(id -u):$(id -g) $HOME/.kube/config
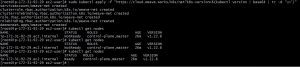
As you have initialized the cluster, now use “Kubectl get nodes” command to get the availability and status of master node.

As you can see status is “NotReady”, even though your cluster initialization is complete you have to install a network addon to establish the communication across pods, I am using Weave Net’s addon , it provides a network to connect all pods together.(refer this link for more information on Weave Net )
sudo kubectl apply -f "https://cloud.weave.works/k8s/net?k8s-version=$(kubectl version | base64 | tr -d '\n')"
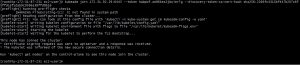
Now agian use Kubectl get nodes
As the Master node is ready now lets join worker nodes to the cluster
Join Worker Nodes to Cluster
execute the below given command on your master node terminal to create and get the join command , you will also get this command when you initialize the culsture using kubeinit command.
kubeadm token create --print-join-command

now go on to the worker node and execute this command to add it to the cluster as a worker node.
kubeadm join 172.31.92.29:6443 --token k0pmud.64mq8t5om6sffih1 \
        --discovery-token-ca-cert-hash sha256:2266fc4315bf447b207c6fee04493fed8ab8b5ffdcef1dab9c059
Let’s verify it from master node

Please connect with Checkmate Management Consulting engineering director to learn more about product engineering, AI/ML development, IT Staff Augmentation Services in India, Hire Software Developer in India, data Lifecycle management and Cloud Engineering Management and Virtual CTO Services . Schedule a meeting today.
