

Cloud Formation
AWS Cloud Formation is a Infrastructure as a Code tool, it means that you can create your cloud infrastructure with a code/syntax using cloud formation tool , you can use either json or yml templets where you declare which resource or service you want to deploy , cloud formation will use these templets and will create the declared resources on the cloud ,you can reuse this templets to deploy same infrastructure or make changes/upgrade to already deployed one’s , In this blog we will learn how to launch a EC2 instance using cloud formation with a yaml templete.
Create a yaml file, something like server.yaml , server is the name of the yaml file I am creating , copy the below yaml syntax and save it, let’s understand it by going through each line
server.yaml
1  AWSTemplateFormatVersion: '2010-09-09'

2  Resources:
3   EC2Instance:
4     Type: AWS::EC2::Instance
5     Properties:
6       InstanceType: t2.micro
7       ImageId: "ami-0186e3fec9b0283ee"
8       SecurityGroups:
9         - !Ref InstanceSecurityGroup

10   InstanceSecurityGroup:
11     Type: AWS::EC2::SecurityGroup
12     Properties:
13       GroupDescription: Allow traffic on port 22(SSH)
14       SecurityGroupIngress:
15         - IpProtocol: tcp
16           FromPort: 22
17           ToPort: 22
18           CidrIp: 0.0.0.0/0
Connect with our technical consultants
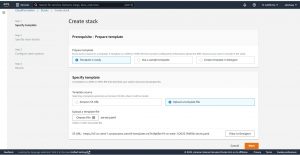
Select “Template is ready ” for “Prepare template” and “upload a templet file” under “Specify templet” , as you can see you can also use a templet stored in S3 bucket, after giving the file path if it’s in s3 bucket/uploading the file if it’s in your local machine , click on next.
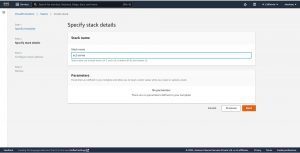
In step-2 give a name to your stack , then click on next.
In Step-3 give tags if required ,and for the Permissions you can create a IAM role and give it here if you want to restrict Cloud formation from using all the permissions of the user that you have logged in on to the web console , for example if you are using Cloud formation from a root user account and you don’t want to allow deletion of ec2 instances from cloud formation create a IAM role with permissions to only create and modify ec2 resources.
Note: Cloud formation can modify , update or destroy resources which are created by cloud formation only.
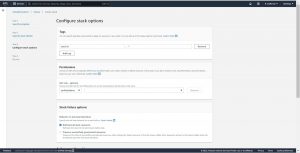
and for Stack failure options select Roll back all stack resources which means that you are instructing cloud formation to roll back all the resources created in case if it fails to create any one the resources that you have declared in the templet / yaml file and the other option is Preserve successfully provisioned resources , this option will keep the resources that are created successfully even if fails to deploy whole stack .
Leave remaining configuration options to default, scroll down and click on next
In Step-4 review the configuration you have made and click on “create stack” , now you will be redirected to events page.
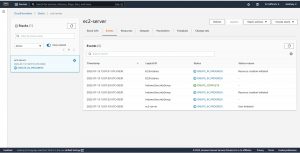
Here you can see the Status of the resources deploying , as you can see in the above image even though I declared creation of security group after declaring the instance creation details in sever.yaml file cloud formation is creating the security group first and than going on to the ec2 instance which implies that cloud formation will scan your templet file and creates the resources in order even thou you do not follow any order while declaring them in your file.
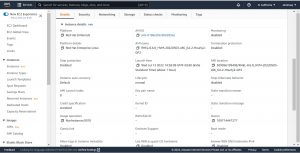
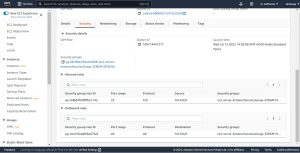
Now let’s go and verify whether deployed EC2 instance uses mentioned AMI, security group and instance type(verify the configuration with server.yaml file that we have used to deploy resources).
below are the snapshots of EC2 instance Launched using Cloud Formation and server.yaml file.
Please contact our team for any offshore infrastructure management services website, LinkedIn
